Achievements

November 25, 2012

Papertrey Ink November Blog Hop

Hello!

Its that time of the month again! No NOT that!! haha, its PTI Blog Hopping time!!! This month the challenge is to get your inspirations from book covers, you could pick your own or use a cover from this photo:


I used the a cover from the photo, the top left. I tend to go a little more literal with my inspirations so for my card i started out by die cutting the alphabets all in shades of blue. The blue tied in nicely to CAS-ual Friday's Blue Challenge and due to it being thanksgiving i had extra time to enter it at CAS-ual Fridays!


Since i was going with blue i made it a baby card and die cut the word congradulations. I die cut the letters out of differnt shades of blue card stock.


The book cover's letters were askued a bit, but for my card i descided to make the letter all straight. As a final touch and to help tie it into an acutally baby boy card i stamped a tiny sail boat, colored the sail red and cut it out.


Thanks so much for stopping by!!

Dana

Supplies
Stamps: PTI Bitty Baby Blessings
Dies: PTI Block Uppercase Alphas
Cardstock: Various

November 18, 2012

Handmade Holidays Blog Hop 2012 Day 3

Welcome to the 2nd Annual Handmade Holidays Blog Hop!!

 
Calling all crafters! We’ve gathered designers from some of our favorite manufacturers to show you ways to create something from the heart this holiday season. This 3 day Hop includes over 60 stops with inspiration brimming from every corner. Explore all of the thoughtful and frugal handmade gifts you could create for the holidays, all in one place, during our second annual Handmade Holidays Blog Hop!
 
To sweeten the Hop, we’re offering a gift for you! For every comment you leave on the blogs in the Hop, you’ll be entered to win a prize pack from one of the participating manufacturer sponsors! Use the Rafflecopter widget on the Clearsnap blog to gain extra entries each day: http://cleasnap.blogspot.com
 
Hampton art is giving away 3 great prize packages! If you like Hampton Art on Facebook leave an extra comment on my blog AND on Hampton Art Blog!!


Visit the list of blogs below and leave a comment on each by Nov 27, 2012 at 11:59 PM PST. Each day we will be sharing a brand new list of blogs with brand new projects for you to explore, be inspired by, and create from! Today is the last hop, if you are just joining us today, click here to start at the very beginning of this 3 day hop!
 
Donna Salazar Designs – http://donnasalazar.typepad.com/
Eileen Hull for Sizzix http://eileenhull.blogspot.com/
Dana Warren - Hampton Art - http://kraftpaperstamps.blogspot.com/
Steph Ackerman – Globecraft Memories - www.stephaniescraps.blogspot.com
Arlene Cuevas – Graphic 45 - http://butterflykisseswithlove.blogspot.com/
Susan Lui – Graphic 45 - http://luv2scrap-pages.blogspot.com/
Ashley Bores – The Twinery - http://www.heartmadelife.com/
Mistra Hoolahan – Donna Salazar Designs - http://mistrabutterfly.blogspot.com
Nina Yang - Hampton Art - http://waffleflower.com/
Angie Blom – Authentique Paper - http://angieblomdesigns.blogspot.com/
Denise Hahn – Clearsnap –http://inmyblueroom.blogspot.com
Stephenie Hamen – Fiskateers - www.mycraftyadventures.com
Guiseppa Gubler – Authentique Paper - http://guiseppagubler.blogspot.com/
Jessica Fick – The Twinery - http://iembellish.blogspot.com/
 
Now on to the project! I started with the Christmas tree from Hampton Art. I just love this tree! I stamped the tree on some linen fabric and let it dry for a minute. Then i stamped the other side, lining up the trees the best i could.
 

Next i punched a snowflake, tied a bow with some bakers twine. I placed a tiny sticker from Authentique on the snowflake center. I made another one of these an adhere both to each side of my fabric.


Next i used half of a globe from Globecraft Memories and filled it with a little bit of glitter. Then i adhered my fabric to the globe. After it dried i adhered the other half to the other side of the fabric. Just make sure the tree is in the middle of the globe!
 
 
Next i covered one rectangle with pattern paper. I only used one layer, but the kit came with 2 other layers. I wanted the ornament to be all about the tree!!
 
For the oval cut out, i used craft knife to cut out an oval. Then i cut along the oval ever so often. Then i folded those over the back of the rectangle
 
 
Then i used some double sided tape to adhere each flap. Then just to make sure they stayed down i outlined each flap with Glossy Accents. Do this for both rectangles (the front and back of the ornament)
 

Last i adhered the two rectangles with the globe in between. I used some tiny cloths pins to hold it together while it dried.


And here are some shots of the finished ornament. The glitter i used coated the globe nicely so it has a nice frosted look, kind of looking out of a frosty window! :


Now i have one more project it for you! While i was waiting for the ornament above to dry, i made 10 dry tags! I think these will make great little ornaments for a mini tree!!


Thanks so much for stopping by, your next stop is the talented  Steph Ackerman.
 
Dana
 
Pine Ornament
Hampton Art - Hot Fudge Studio - Christmas Tree - PS0715
Authentique Paper - Peaceful Collection: Solitude, Cozy, Chill. Festive Collection: Festive Details
Colorbox - Chalk Ink: Olive Pastel
The Twinery - Cappuccino, Honey Dew
Globecraft Memories - 3-D Double Sided Rectangle Ornament Kit
Fiskars - White Christmas Snowflake
Other: Ranger: Glossy Accents. Glitter: Martha Stewart
 
Tag Set (i used the above supplies, along with the below)
Hampton Art - Believe in Christmas - SC0273, Holiday Dream Wishes - SC0274, Just Add Snow - SC0271.
Authentique Paper - Festive Collection: Festive Details, Jolly, Joyful
Colorbox - Chalk Ink: Dye Ink: Mudslide, True Black
Piccolo - Decor Style #5
The Twinery - Maraschino, Charcoal
Fiskars - XXL Tag, Medium Snowflake, Ornamental. Border Punches: Lacy Doubles, Banners Away
Other: Cardstock: The Paper Studio - Kraft.


November 13, 2012

Scor-Pal and Hampton Art Feature Week

Hello!

Welcome to another day of Scor-Pal and Hampton Art Feature Week. Both Hampton Art and Scor-Pal designers have made some great projects, so make sure to stop by both blogs all week long. And of course there’s prizes!!

I made a super cute and easy card gift set. First the card. I started with a couple 12 x 12 sheets of Kraft cardstock to make my cardbases.

Next I placed one card in the Scor-Buddy and scored at the triangle and the one next to it.
Then I scored another line at the 3.5 line.

Next I rotated the card and scored two more lines.
 
I repeated the scoring for each card until I had 4.

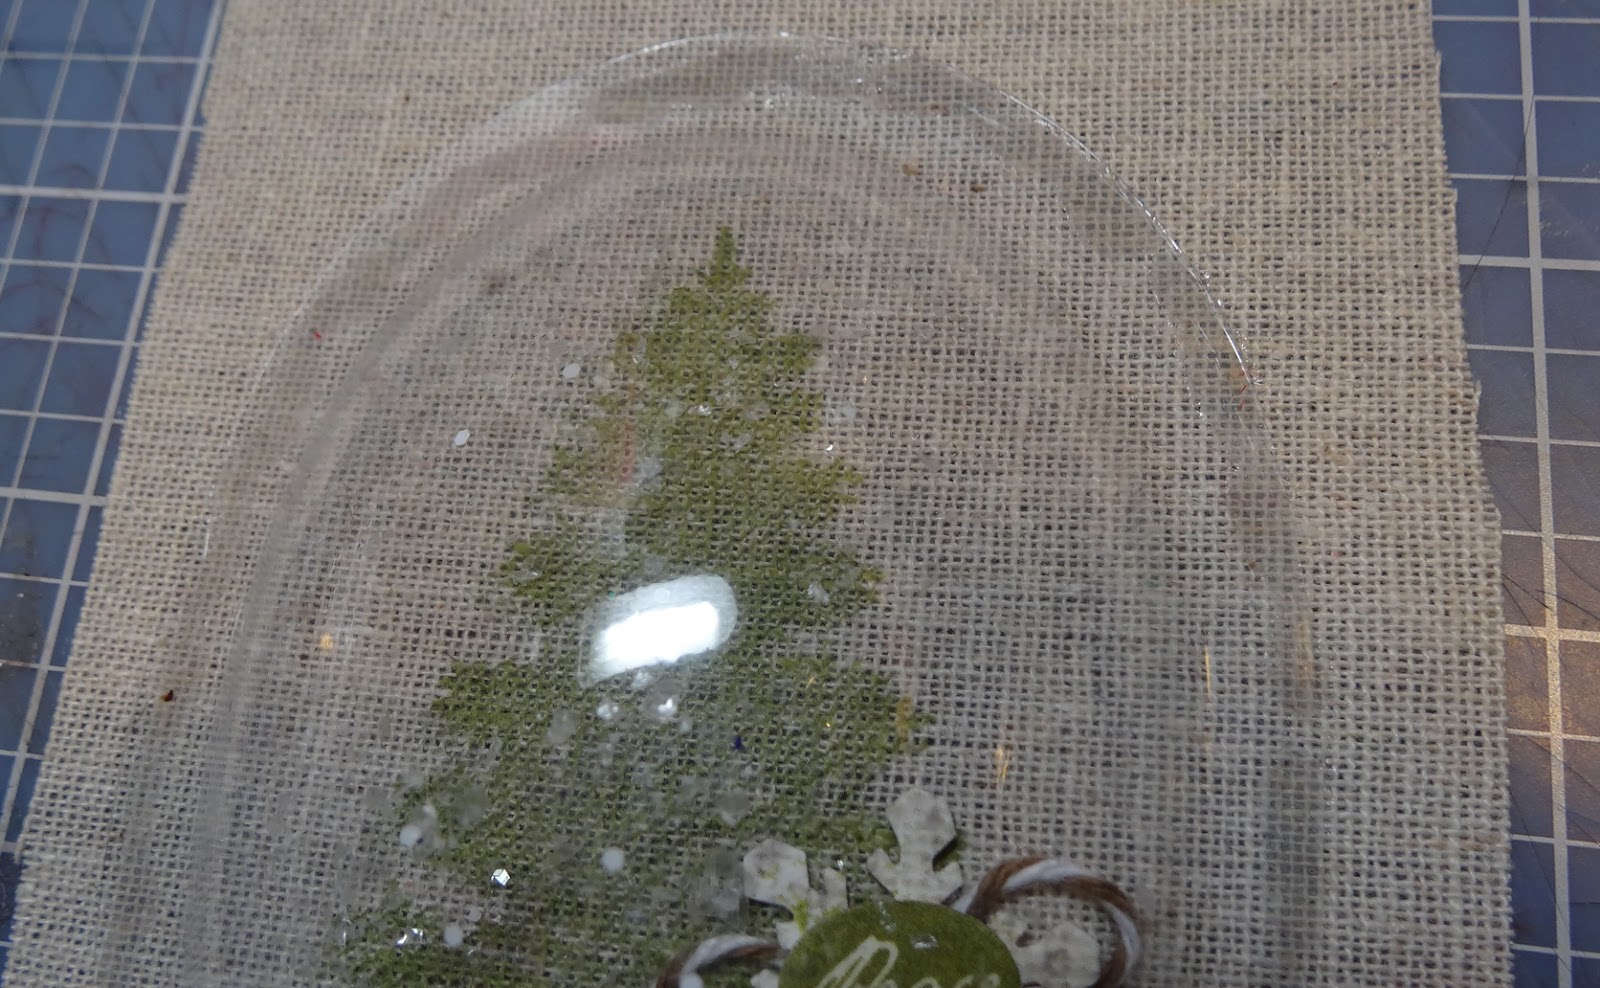
Now on to some stamping!! I stamped a swirl and star in Putty ink. Next I stamped the pine tree with Olive Pastel chalk ink. I really like using this ink for tree on Kraft paper. First here’s a pic just after stamping.

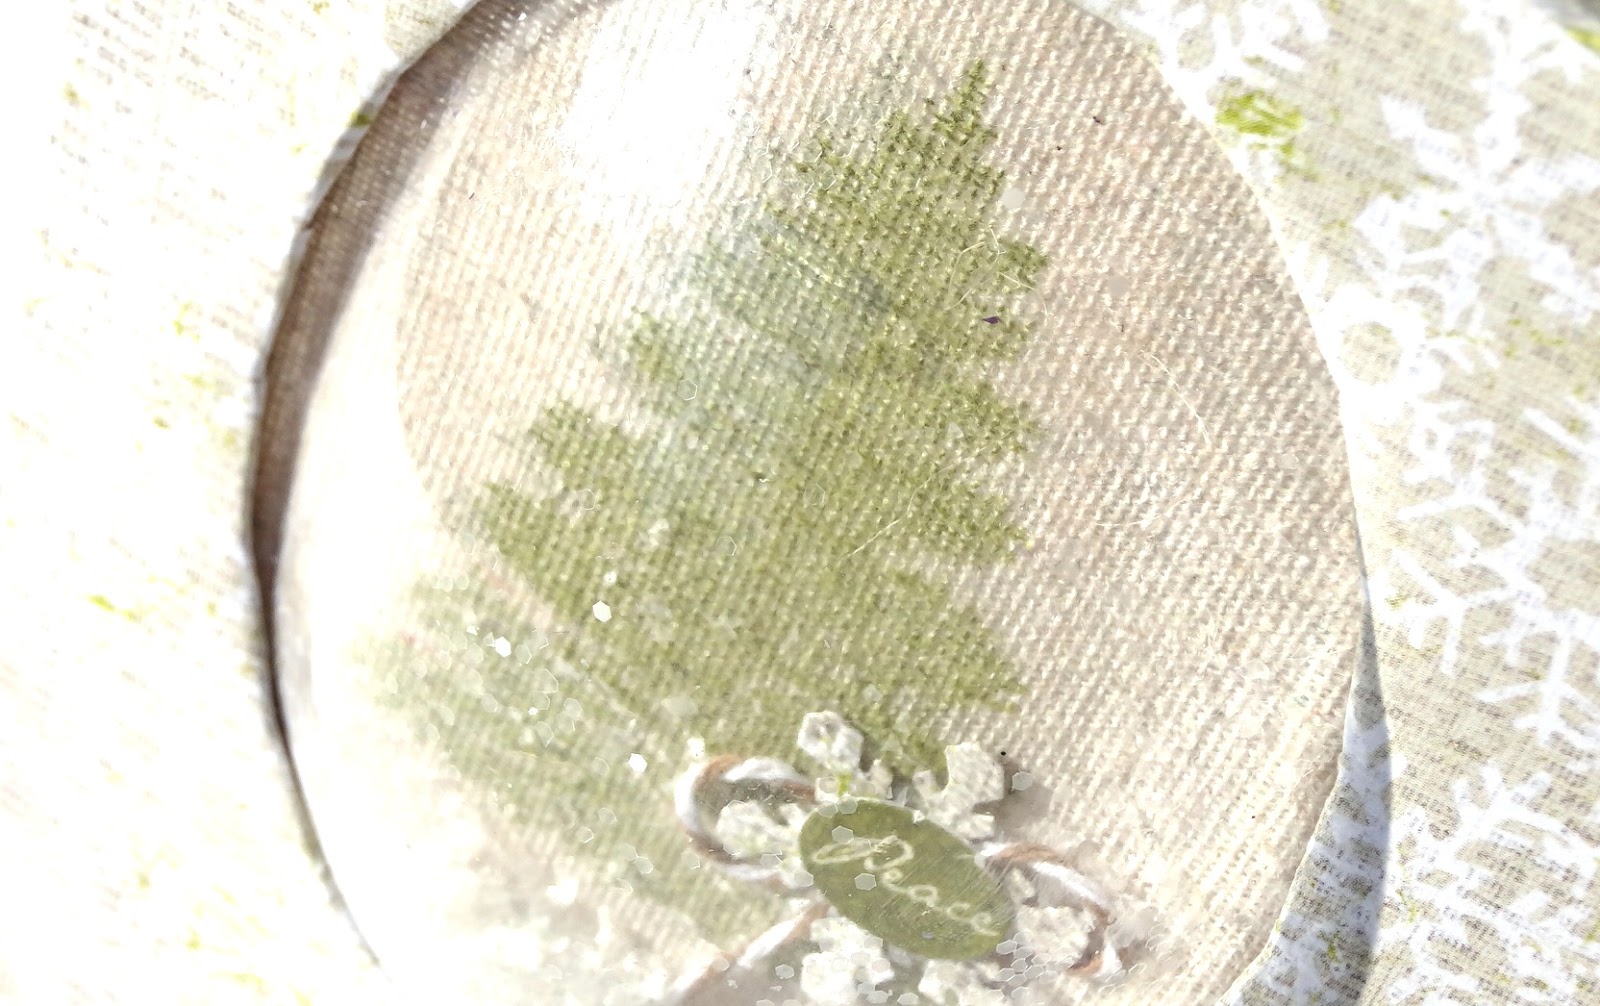
And here is about 30 seconds later.

When the ink dries, the tree looks even more like a pine tree!

 Last I stamped Merry Christmas across each card.

Now we are going to make an easy envelope to hold the cards. Take a 12 x 12 sheet of cardstock and score it at 6 inches

Next score one edge at .5 inches and fold.

Next move the cardstock down so the folded edge is up against the Scor-Buddy. Then score at 5.25 inches.

Next cut your card stock .5 inches from the 5.25 score line.


 Fold the 5.25 score.

Add double sided tape along the two flaps

Next carefully fold the cardstock at the 6 inch score, so you are adhering the flaps together.

And now your cards envelopes should fit into your envelope.

I used an eyelet, button and twine to secure my card envelope. But really you can do it any way you want to.

I went on to stamp and embellish my envelope. I also added a tag so I can give it as a gift this Christmas. Here are a few shots of the card and stamped envelope.


I hope this inspires you to make a gift card set! Make sure you stop by the Scor-Pal blog and Hampton Art blog each day this week for some great inspiration and prizes!!

Dana

 Supplies:

Hampton Art Stamps: Signature Collection: Believe in Christmas SC0273, Holiday Dream Wishes SC0274 (clear stamps). Hot Fudge Studio: Holiday Tag PS0489A, PS08716, PS0715 (wood stamps).
Colorbox Ink: Dye Ink – Putty, Wicked Black. Chalk Ink – Olive Pastel
Cardstock: The Paper Studio – Kraft
Fiber: Twine – May Arts
Embellishments:  Eyelet – The Paper Studio. Button – Unknown

November 9, 2012

Hampton Art Stamps Design Team Holiday Gifts Blog Hop


Hello!

Welcome to Hampton Art Stamps DT Holiday Gift Blog Hop!! If you arrived here from Adora's blog in are in the right spot. If you are just stopping by you can start at Hampton Art Blog and make your way through the hop starting here! 

The hop will be open for the entire weekend, giving you time to visit all of the blogs. On Monday, November 12th, we will be drawing for these fantastic prizes!


In order to be entered to win the prize, simply leave a comment on each of the blogs listed blow, including the Hampton Art Stamps Blog! We will choose 2 blogs at random, and 2 comment from those blogs to win a prize.

Here is the list of Design Team Blogs:

Hampton Art Stamps Blog
Gloria Stengel
Britt Bass
Adora Concepcion
Dana Warren
Vivian Keh
Gini Cagle


Do you like to recycle or reuse packaging!?! Then this is the project for you! I remember seeing some similar ornaments, i don;t know how long ago, i couldn't;t exactly remember how they did it so i started playing around with my supplies and this is what i came up with!!

I cut a piece of cardboard from an empty shipping box and ran it through my die cutting machine. I tried this with several different dies and i found that Sizzix big thick dies worked the best for me, but you could really use any dies.


I choose a big snowflake shape (i found the bigger the die image the better) and i also die cut it from Kraft cardstock. Next i added some white paint around the edges and a little bit here or there, the idea is to give it a weathered look.

After the paint was dry i used glue to adhere some clear chunky flakes around all the edges. Set that aside to dry.

Meanwhile die cut a Kraft circle and adhere the chunky flakes around the circle. When that is dry stamp the sentiment in the center.


Last assemble the ornament. Adhere the sentiment circle to the front and embellish (i used 2 straight pins that matched the ink). Then create a loop from twine and adhere to the back, last adhere the kraft snowflake to the back.


So an easy ornament to make! Right!?!  I hope this inspires you to make some ornaments this Christmas season!

Your next stop is the VERY talented Vivian!

Dana

Supplies
Stamps: Hampton Art - Just Add Snow SC0271
Ink: Colorbox Pigment Ink - Blue
Die - Sizzix - Snowflake
Chunky Snow - Martha Stewart
Kraft: The Paper Studio
Twine: May Arts